背景

租户应用通过内网访问云服务可以做到带宽成本趋近零 (一般免费)。内网线路的带宽上限要比公网线路高得多。

阿里云等大的云厂商,其云服务通常兼具外网域名和内网域名。虚拟机使用内网域名发送请求时,流量会通过内网线路到达云服务。 阿里云对象存储 OSS 即在此例,参见 OSS内网域名与VIP网段对照表

背后原理应该是默认对客户 VPC 和云服务 VPC 做了 JOIN,使得 OSS 在客户 VPC 可达 (via 100.64.0.0/10)。

在 Kubernetes 之上,搭配使用 KubeVirtKubeOVN,小厂商可以快速获得虚拟机 (virtual machine, VM) 和软件定义网络 (Software-Defined Networking, SDN)。同样地,租户亦有使用内网访问云服务的需求。

虽然 KubeOVN 支持 VPC 互通,但并不支持自定义 VPC 和物理节点互通。如果某项云服务跑在物理机上,仅使用 KubeOVN 则意味着流量需要在同机房的外网线路兜一圈。带宽上限会比较低。

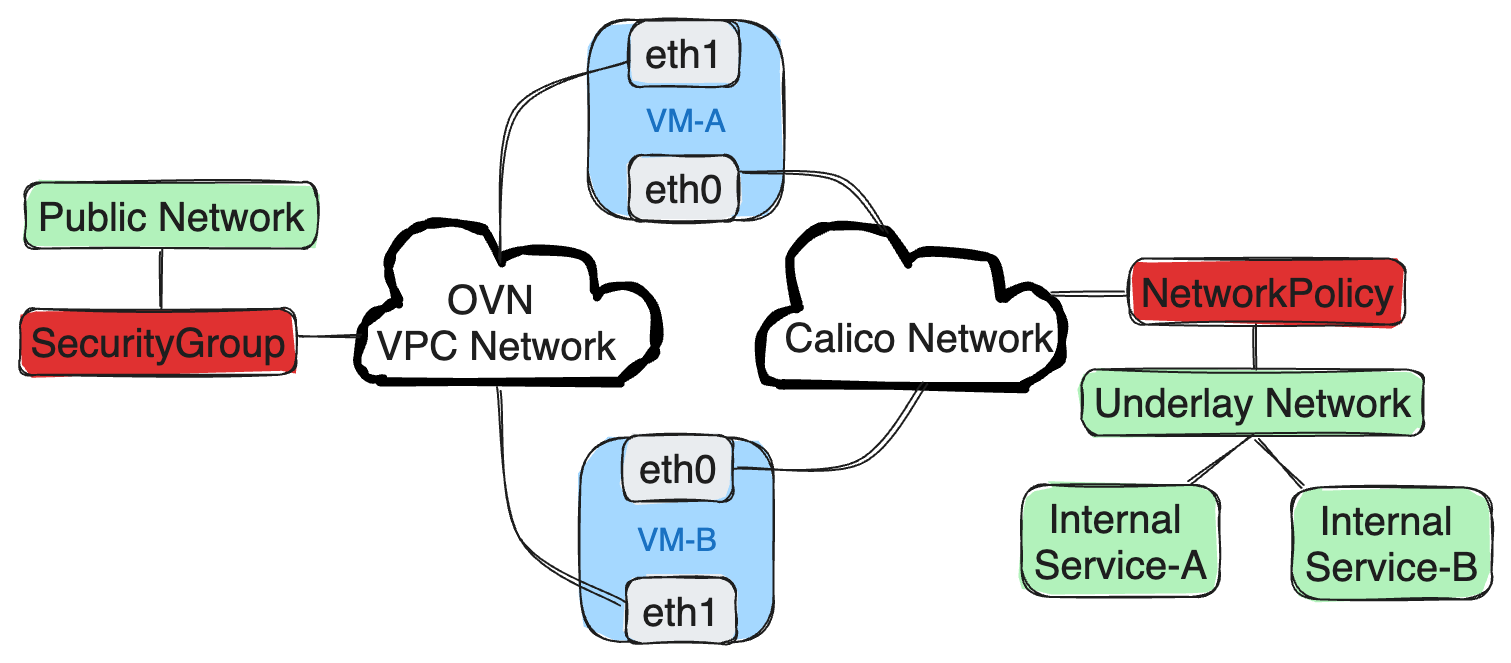
可行的解决方式是使用 Multus-CNI 为虚拟机提供多张网卡,由不同网卡提供不同能力

  • KubeOVN 网卡提供 VPC, SecurityGroup 等 SDN 能力
  • Calico 网卡提供节点网络访问能力。访问权限必须是安全受限的。这一点可以由 Calico network policy 达成。

下文分小节展示具体细节。

Multus 配置

虚拟机相关 CNI 配置均通过 NetworkAttachmentDefinition 管理,直接自 /etc/cni/net.d/ 目录拷贝即可。

 1
 2
 3
 4
 5
 6
 7
 8
 9
10
11
12
13
14
15
16
17
18
19
20
21
22
23
24
apiVersion: k8s.cni.cncf.io/v1
kind: NetworkAttachmentDefinition
metadata:
  name: calico
spec:
  config: |-
    {
      "name": "k8s-pod-network",
      "cniVersion": "0.3.1",
      "plugins": [
        {
          "_comment_": "Calico configs copied from /etc/cni/net.d/10-calico.conflist, fileds except 'type' are ignored",
          "type": "calico"
        },
        {
          "_comment_": "handle Calico default route",
          "type": "x-calico-route"
        },
        {
          "_comment_": "used to fix mac address"
          "type": "tuning"
        }
      ]
    }    
 1
 2
 3
 4
 5
 6
 7
 8
 9
10
11
12
13
14
15
16
17
apiVersion: k8s.cni.cncf.io/v1
kind: NetworkAttachmentDefinition
metadata:
  name: kubeovn
spec:
  config: |-
    {
      "name": "kube-ovn",
      "cniVersion": "0.3.1",
      "plugins": [
        {
          "type": "kube-ovn",
          "server_socket": "/run/openvswitch/kube-ovn-daemon.sock",
          "provider": "kubeovn.default.ovn"
        }
      ]
    }    

KubeVirt VirtualMachine 声明及注意点

KubeVirt VirtualMachine spec.networks 所有类型为均为 multus。 这样做较为灵活。注意,有 pod 类型网络存在时,无法指定 multus 类型网络为默认。

 1
 2
 3
 4
 5
 6
 7
 8
 9
10
11
12
13
14
15
16
17
18
19
20
21
22
23
24
25
26
27
28
apiVersion: kubevirt.io/v1
kind: VirtualMachine
...
spec:
  running: true
  template:
    metadata:
      annotations:
        cni.projectcalico.org/ipAddrs: '["10.199.3.153"]'
    spec:
      domain:
        ...
        devices:
          interfaces:
          - bridge: {}
            name: default
          - bridge: {}
            name: second
          networkInterfaceMultiqueue: true
      networks:
      - multus:
          default: true
          networkName: default/calico
        name: default
      - multus:
          networkName: default/kubeovn
        name: second
      ...

这里 Calico PodCIDR 为 10.199.0.0/16。注解 cni.projectcalico.org/ipAddrs 表示向 Calico 申请固定 IP。为避免 IP 冲突,可以专门为 VM 预留一批 IP。具体参见 Use a specific IP address with a pod

KubeVirt 会将网络转换为 Pod 注解 v1.multus-cni.io/default-networkk8s.v1.cni.cncf.io/networks

  1. v1.multus-cni.io/default-network: default/calico 声明第主网卡为 calico
  2. k8s.v1.cni.cncf.io/networks: '[{"interface":"pod16367aacb67","name":"kubeovn","namespace":"default"}]' 声明额外的 KubeOVN 网卡

Multus 读取到 annotation 之后,会读取集群 NetworkAttachmentDefinition,接着按照声明为 VM Pod 创建网卡。

更通顺的逻辑是第主网卡使用 KubeOVN,次网络使用 Calico。但 Calico 在检测到 Pod network namespace 设置过 default 路由时,会报错并无法分配网卡,详见 Calico issue 5199

处理方式是在 Calico CNI 插件之后增加一个路由处理插件 x-calico-route,删除 Calico 设置的默认路由,并增加 underlay 网络路由 (10.199/16 为 Calico PodCIDR, 10.50/16 为 Node CIDR)。

 1
 2
 3
 4
 5
 6
 7
 8
 9
10
11
12
13
14
15
16
17
18
19
20
21
22
23
24
25
26
27
28
29
30
31
32
33
34
#!/usr/bin/env bash

### CNI x-calico-route
### Remove calicos default route and add specific routes for node/internal-service access

set -eEuo pipefail
shopt -s inherit_errexit

inputData=$(cat)

cniVersion=$(echo "$inputData" | jq -r .cniVersion)
if [[ $cniVersion != "0.3.0" ]] && [[ $cniVersion != "0.3.1" ]]
then
    exit 1
fi

case $CNI_COMMAND in
    VERSION)
        echo "{\"cniVersion\": \"$cniVersion\", \"supportedVersions\": [\"0.3.0\", \"0.3.1\"]}"
        exit 0
        ;;
    ADD)
        nsenter --net="${CNI_NETNS}" bash -euxc "ip route del default; ip route add 10.199.0.0/16 via 169.254.1.1; ip route add 10.50.0.0/16 via 169.254.1.1"
        # Pass through previous result
        echo "$inputData" | jq -r .prevResult
        exit 0
        ;;
    DEL)
        exit 0
        ;;
    *)
        exit 4
        ;;
esac

KubeOVN 作为次要网络时,不会设置默认路由,有两种解决方式:一是使用类似 x-calico-route 的路由插件自动插入,二是在使用 KubeVirt 提供的 cloud-init Network configuration

这里 OVN Subnet/Switch CIDR 为 10.0.1.0/24,网关为 10.0.1.1。

以下是 Network configuration v1,适用于 CentOS 7 等内核版本较低的情况。

 1
 2
 3
 4
 5
 6
 7
 8
 9
10
11
12
13
14
15
network:
  version: 1
  config:
  - type: physical
    name: eth0
    subnets:
    - type: dhcp
  - type: physical
    name: eth1
    subnets:
    - type: dhcp
      routes:
      - gateway: 10.0.1.1
        destination: 0.0.0.0
        netmask: 0.0.0.0

以下是 Network configuration v2,适用于 Ubuntu 18.04, 20.04, 22.04 等。

 1
 2
 3
 4
 5
 6
 7
 8
 9
10
network:
  version: 2
  ethernets:
    enp1s0:
      dhcp4: true
    enp2s0:
      dhcp4: true
      routes:
      - to: 0.0.0.0/0
        via: 10.0.1.1

这里的方案使用了 cloud-init,且没有 dhcp 匹配设置。

如果只能使用 CNI,默认的 cloud-init v2 版配置会按照 macaddress 分配 IP。

1
2
3
4
5
6
7
8
network:
    ethernets:
        enp1s0:
            dhcp4: true
            match:
              macaddress: 00:00:00:bd:3d:41
            set-name: enp1s0
    version: 2

这时可以考虑使用 Kubemacpool 之类的方案固定 Calico 网卡 Mac 地址。

underlay 网络策略

参照 Get started with Calico network policy 为 VM 设置 underlay 网络策略,以下示例为只允许虚拟机 testvm 访问 IP 10.50.31.2180 端口443 端口

 1
 2
 3
 4
 5
 6
 7
 8
 9
10
11
12
13
14
15
16
apiVersion: projectcalico.org/v3
kind: NetworkPolicy
metadata:
  name: vm-egress
  namespace: test
spec:
  selector: vm.kubevirt.io/name == 'testvm'
  types:
  - Egress
  egress:
  - action: Allow
    protocol: TCP
    destination:
      nets:
      - 10.50.31.21/32
      ports: [80, 443]

总结

通过 CalicoKubeOVN 双网卡,本文实现了一种向 KubeVirt 虚拟机租户提供了可控的内网访问方式。

K8s 平台方可以考虑采用这种方式,向不受信任的租户提供内网服务访问。

你可以点击查阅 过程脚本,并使用 KinD 集群验证本文提出的方法。

⚠️⚠️⚠️ 注意

前文提及,为避免 IP 冲突,项目可以使用 Calico IPReservation 为 VMs 预留一批 IP 地址。 为实现规模化,可以基于 K8s mutating admission webhook server 来实现全局 IP 分配服务。 该服务会拦截 VMs 创建请求,自请求获取 VM 对象,并向资源池发起 IP 分配请求,最后将获分配 IP 写入 template 注解 cni.projectcalico.org/ipAddrs 中。

如果采用CNI 插件方式,如 x-calico-route,进行路由定制,可以将其打包在容器镜像中,并通过 DaemonSet 分发到所有节点目录 /opt/cni/bin 中。

如果采用 cloud-init Network configuration 定制路由,也可以通过 mutating admission webhook server 对新创建的 VMs 进行动态修改。